Collecting responses through Google Forms is a convenient way to gather data for surveys, event registrations, or feedback forms. However, manually checking form responses can be time-consuming and inefficient, which is why setting up email notifications is a good idea.
Thankfully, Google Forms provides a built-in feature to set up and automate email notifications.
When enabled, email notifications are sent to notify individuals or groups whenever someone submits a response to a Google Form.
In this article, we will explore the benefits of using email notifications for Google Forms and provide a step-by-step guide on how to set them up effectively.
Table of Contents
Why Set Email Notifications?
Without automated notifications, staying on top of new responses can be challenging. Here are a few reasons why you should set email notifications for Google Forms:
- Email notifications allow you to receive instant alerts whenever a user submits a response. This ensures that you can promptly review and take action on the received data, enabling faster response times.
- By automating the notification process, you save valuable time that would otherwise be spent constantly checking your form for new submissions. Email notifications keep you informed without the need for manual intervention.
- Email notifications can be sent to multiple recipients simultaneously. This enables efficient collaboration within teams, departments, or project groups, ensuring that everyone stays informed about the responses.
- Google Forms allows you to customize the content and format of your email notifications. This flexibility allows you to tailor notifications to include specific details, such as form responses or other relevant information. It helps in keeping your inbox organized by providing consistent and structured notifications.
How to Create Email Notifications
Here’s a step-by-step guide for how to get an email when a Google Form is submitted if you’ve already created your survey:
Step 1: Start by creating a new form or selecting an existing one from your Google Drive. Add the necessary questions and customize the form as required.
Step 2: Once you have designed your form, go to the Responses tab.

Step 3: Click on the three vertical dots to open the options menu.
Step 4: Check the box labeled “Get email notifications for new responses.” This action enables the email notification feature.

That’s all it takes! Now notifications are sent to the email address associated with your Google account.
Related: Google Forms Survey Template
Using the Email Notifications for Google Forms Add-on
You can also use an add-on to get email notifications for Google Forms. Unlike other add-ons for Google Sheets and Google Docs, which can be found inside the platform through the extensions menu, you have to search externally for Google Forms add-ons.
The Email Notifications for Google Forms add-on lets you automatically send email messages every time a respondent submits your Google Form.
Here’s how to use the Email notification for Google forms add-on to set email notifications:
Step 1: Go to the Google Marketplace and install the extension.

Step 2: Allow permissions.

Step 3: Go back to Google Forms.
Step 4: Once the extension is installed, it may add a new icon or menu option to your browser.

Click on the extension icon to open the extension settings.

Step 5: Within the extension settings, click on the option Enable Notifications.

A small side panel will appear with options to configure the email notifications for your Google Forms.

Step 6: Click on the option ADD NEW RULE.
This may include specifying the recipients, customizing the email content, setting notification triggers, and other relevant settings.
Step 7: Enter a name for your notification to easily identify it.

Step 8: Add the email addresses that you want to send notifications to, as well as a sender name and email address.

You can add as many emails as you want for the email address to notify section.
You can also send an automated email to each respondent who fills out the form by checking the box.

After configuring the settings, save any changes you made within the extension. The extension may also provide an option to activate or enable the email notifications feature.
Google Form Notification to Multiple Emails.
To set up Google Form notifications to multiple emails, you can use the Email notifications for Google Form add-on. Follow these steps:
Using the Add-on
Step 1: Click on the addon icon.
Step 2: Add Multiple Email Recipients. In the field, for the Email Address(es) to Notify section, add the multiple emails you want to receive notifications.
For example, example1@gmail.com, example2@gmail.com, example3@gmail.com.

Step 3: Configure the rest of your settings for your notification.
Step 4: Once you have configured the email notification settings, click on the Save Rule button at the bottom Settings window.

This will allow multiple emails to receive a notification whenever a responder fills the form.
Using Google Sheets
You can also use Google Sheets to send notifications to multiple emails from Google Forms. All you need to do is link the form to Google Sheets and set notification settings in the spreadsheet. Here’s how:
Step 1: Turn on saving from submissions to Google Sheets:
Go to the responses tab and click on “Link to sheets.”

Step 2: Choose whether to create a new spreadsheet or an existing one.

Step 3: Go to the spreadsheet in Google Sheets.
Step 4: Click Share and add the email of the users you want to receive the notifications.

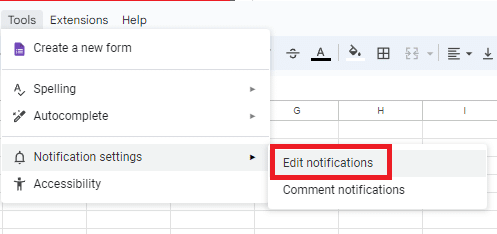
Step 5: Go to Tools > Notifications to set the notification rules.

Step 5: Select the option Edit notifications.
Step 6: Choose the option for when A user submits a form and click Save.

This will send an email notification every time a form is filled since it’s linked to Google Sheets. However, you can only set notifications for yourself, so the other email users will need to go to the spreadsheet and set the notification settings as well.
Frequently Asked Questions
How Do I Send Google Form Notifications to Another Email?
By default, Google Forms will send notifications to the email account associated with your Google account. If you want to send the notifications to another email, you may have to sign in to a different Google account.
Better yet, you can use the extension for email notifications for Google Forms to send notifications to another email. We’ve shown you how to use the extension in the guide above.
Wrapping Up
Email notifications for Google Forms offer a convenient and efficient way to stay on top of responses without the need for manual monitoring.
By enabling email notifications and customizing the settings, you can receive real-time alerts, collaborate seamlessly with team members, and optimize your workflow.
If you found this article useful, make sure you also check out our premium template library where you can use the code SSP to save 50%.
Related:
- How to Use People Chips in the Google Suite
- How to Mail Merge in Google Sheets
- How to Turn on Notifications for Google Sheets
- Take a Google Forms and Sheets Masterclass to Upskill Effectively
- Download Free Google Docs Order Form Templates
- How to Find Answers on Google Forms Easily
- How To Make Google Forms Ranking Questions [Beginner Guide]
- 3 Ways to Collect Google Forms Signatures