This guide will show you step-by-step how to add a header in Google Docs. We will also cover how to customize the layout and margins, adding page numbers, using the mobile apps, and how to completely remove the header. Read on to learn everything you need to know about headers in Google Docs.
Table of Contents
How to Create a Header in Google Docs
It is impossible to add a header to a Google Docs document if it is pageless, as a pageless document does not have a “page” setup and, therefore, no space for a header and footer. Related: How to Make a Brochure in Google Docs
Once you have returned to a page setup and written your document, adding a header to your Google Doc is very simple.
Here is how to get a header on Google Docs:
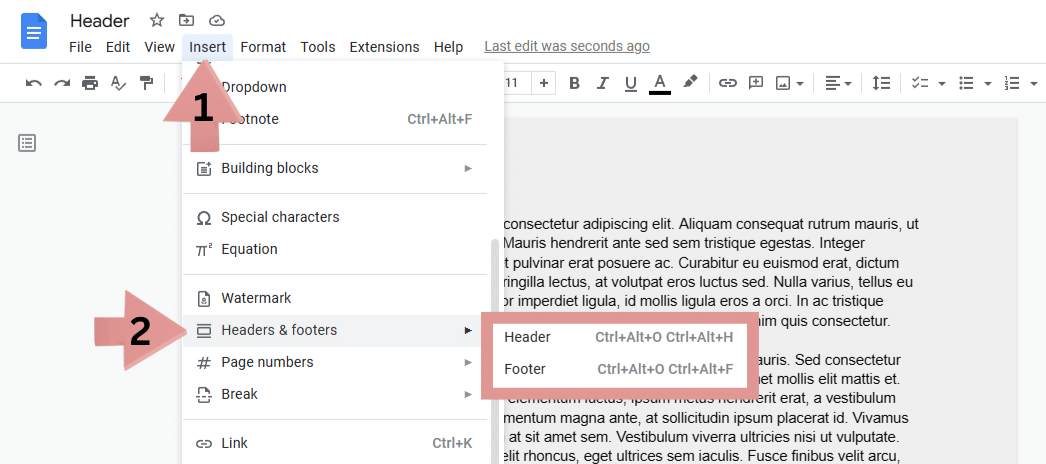
- Open the document that you want to add the header into.

- Click on Insert.
- Select Headers & footers.
- In the smaller menu, you can select whether you want to add a Header or Footer to the document.
Once you have accessed the header, add the text or images you want to be included. You can make edits such as changing the style of your text, adding images, tables, and more.
You can exit the header editor by clicking on your document’s main body. If you want to edit the header again, double-click on it.
Customizing the Header or Footer in Docs
Editing the header in Google Docs is just as simple as editing any other text. But, you can alter two settings other than the content of the header or footer: the layout and the margins. Let’s take a look at how you can edit both.
Layout
You can put different types of information in the document’s header. For example, if you are making a lab report, you can add the patient’s name, the date, the technician’s name, and other information in the header. And for the remaining pages, you can add the name of the patient and the report’s title. Each of these may require a different layout.
Here’s how to change your layout by selecting a different first-page header or footer:
- Open the header formatting menu in the document by double-clicking on the header text.
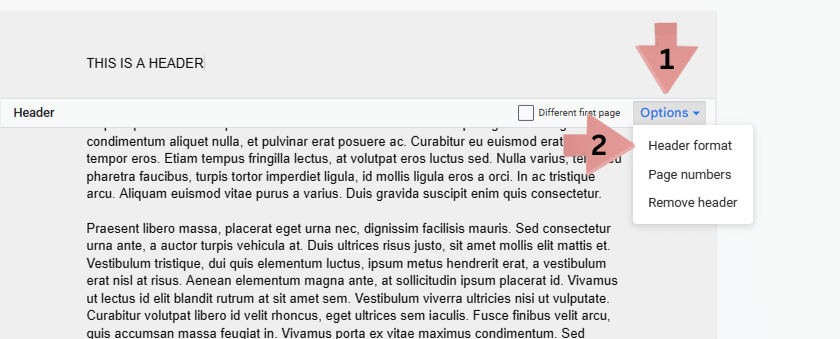
- Click on the blue Options button towards the bottom right of the header.
- Click on the Header Format option.
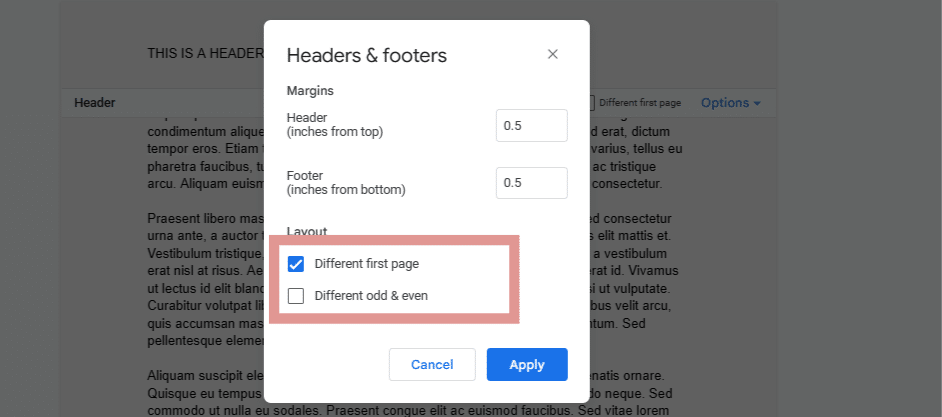
- You will see multiple options for changing the header margin and layout here. To make sure the header for the first page is different than the rest, click the Different first-page option to turn it on.
- Choose the Apply option to save the changes.
It is better to tick the Different first-page option before editing your header. If you tick this option after adding your content to the first page’s header, the header will be kept on the following pages before the option is enabled. The other headers will not get any new content you add. Additionally, you can create unique odd and even footers and headers. If you don’t select this option, the odd and the even pages will have the same footer or header.
Margins
Changing the margin settings lets you choose how far from the document you want your header to be or how far from the bottom of the document you want your footer to be.
Here are the steps to do this:
- Go either to the header or the footer in the document.
- Click on the Options button.
- Click on the Header Format option. You can do the same with the footer.
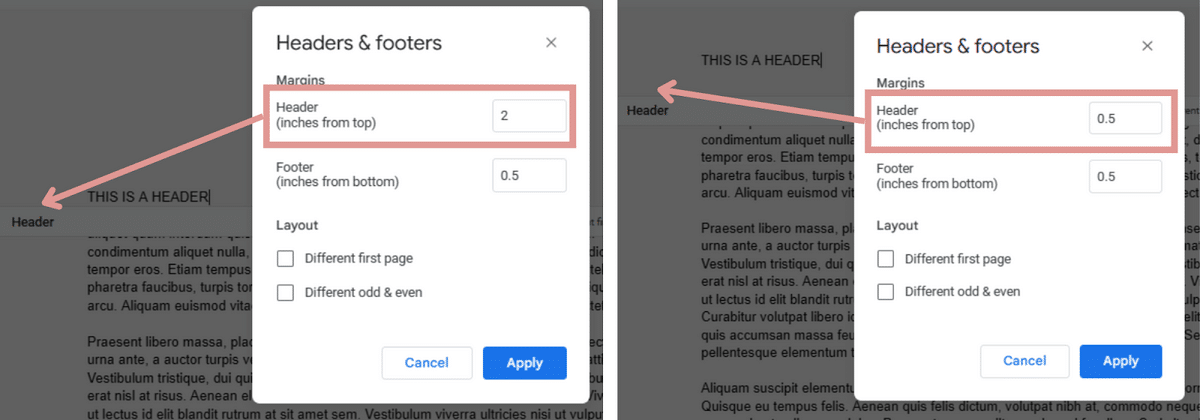
- You can change the margin as you like from the window. The more distance you create between the header and the top of the page, the farther away the header will be from the top of the document. Similarly, the footer will increase the distance between the bottom of the page and the footer.
- After you are done adjusting, click on the blue Apply option.
How to Add Header and Page Number in Google Docs
Page numbers are very important in the header and footer functions as they can help the reader navigate the document more easily. In Google Docs, they lay down the foundation for your content’s table. Page numbers can be displayed in either the page’s footer or the header.
Here is how to add a header and page number in Google Docs:
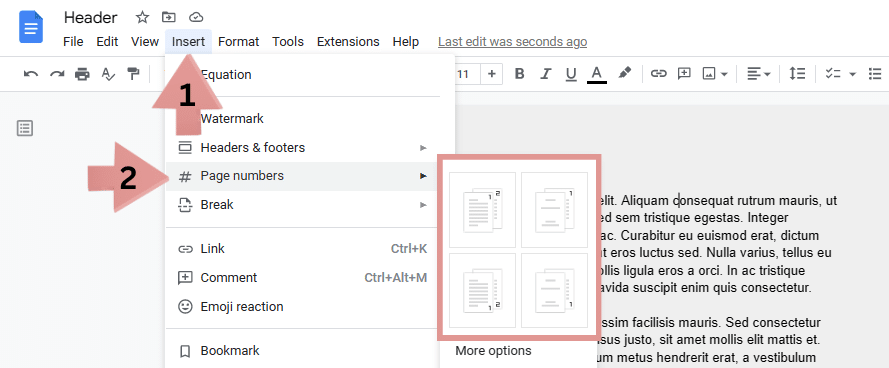
- In your document, click on the Insert option from the ribbon.
- Choose the Page numbers option. It will allow you to choose one of the four arrangements: two options for adding a page number in the header and two options for the footer. One of each option leaves out the first page. You can choose one of the four arrangements to display your page number quickly.
- For manually configuring the page number, click on the More options button, which will bring up a window for page numbers.

- First, you must choose where you want to display the page numbers; it can either be in the Footer or the Header.
- Then, select whether you want to display the page number on the first page; it will still be counted but won’t display the page number.
- Now, you can choose the page number you want your document to start on; mostly, it’s left as 1.
- After you are done editing the options, click on the Apply option.
You will now be able to see your page numbers. Go to the header or the footer to customize the page number’s style. These styles include changing the alignment, color, font, and more. After you change the style for one page, the remaining pages will follow the same style.
How to Remove a Header in Google Docs
After adding a header, it is easy to remove if you change your mind. Here is how to remove a header:
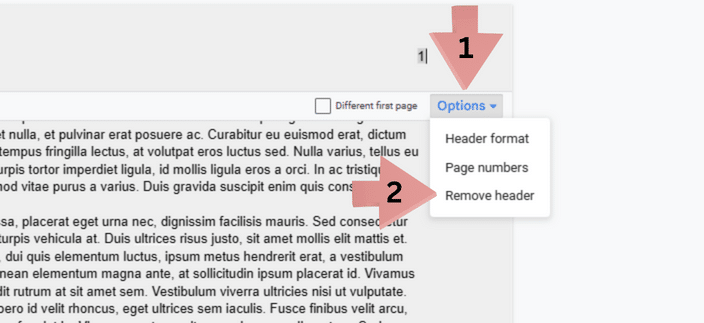
- Double-click on the header in your document to display the options.
- Click on the Options button in the header.
- Click on the Remove header button, which will remove the header from your document.
Related: Easily Insert a Google Sheet Into Google Docs
How to Put a Header on Google Docs on Mobile
The Google Docs mobile application is not as good as the web version; however, you can easily add a header or footer to any Google Document. The steps for adding them to both Android and iOS are the same.
Here is how to do headers in Google Docs for mobile:
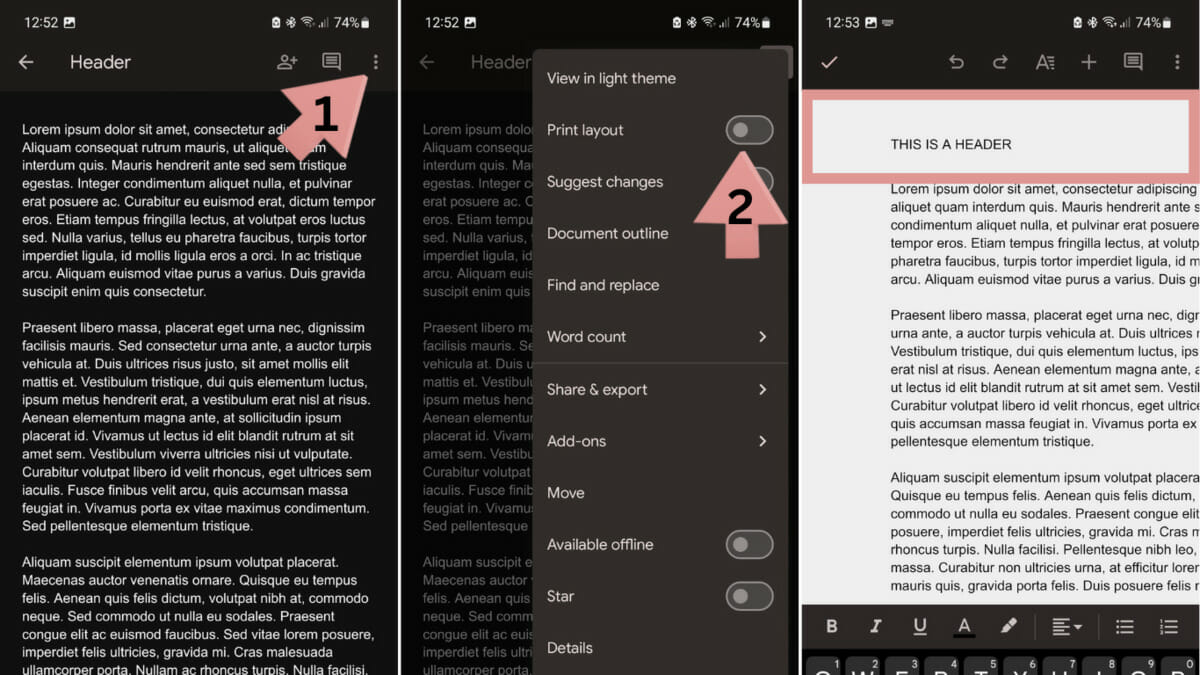
- On the Google Docs application, open the document where you want to add the header.
- Click on the vertical dots in the top right corner. This will open a dropdown menu.
- You will see a Print Layout option. Turn the toggle on.
- Click on the page’s top and write something to create a header.
Frequently Asked Questions
Can I Put a Header on Just One Page of Google Docs?
You can add a header to just one page in your document. To do this, open your Google Document and click on the Insert option. Now choose the Header > Page Number. Tick the Different first-page header/footer option. Then add the header to the first page, but make no edits to the other pages.
How Do I Link a Header to a Section in Google Docs?
Highlight the text you want to link and click the Insert link option. Click on the Headings and bookmarks option in the small window that shows up. Here, select the heading or bookmark you want to link to.
Wrapping Up
Hopefully, learning how to add a header in Google Docs was pretty straightforward. To summarize, you simply have to navigate to Insert > Headers and footers and then follow the on-screen prompts. If you found this guide useful, check out some of our related content below to keep learning.
Related:
- How to Make a Flyer in Google Docs
- How to Delete a Page in Google Docs (4 Ways)
- Find and Replace in Google Docs
- How to Make a Hanging Indent in Google Docs
- How to Use Google Sheets and Docs Offline
- A Guide to Using Mail Merge in Google Sheets
- How to Insert Symbols in the Google Suite
- How to Make a Table of Contents in Google Docs
- How to Create a Folder in Google Docs