When working with large datasets or organizing information in a structured manner, you may encounter a scenario where you would like to insert multiple rows to accommodate new data or make your worksheet more readable.
Inserting rows manually can be time-consuming, especially when dealing with many rows. But inserting multiple rows in Excel doesn’t have to be complicated. In this tutorial, we’ll show you four easy methods on how to insert multiple rows in Excel. Read on to learn more.
Table of Contents
How To Insert Multiple Rows in Excel
There are several methods you can use to insert multiple rows in Excel, each offering flexibility and convenience for different scenarios. We’ll look at each method to insert rows with a step-by-step guide and examples.
Method 1: How To Insert Multiple Rows in Excel Using Insert Menu
The first method for inserting multiple rows is pretty straightforward and lets you determine how many new rows you want to insert. It uses the built-in “Insert” tool to add rows in Microsoft Excel. This can be found in the toolbar.
Here’s how to add multiple rows in Excel using the insert feature:
- In our Excel worksheet, select how many rows you want to add.
- In our example, we want to add four rows.
- Select the rows by holding and dragging the cursor on the row numbering or by holding down the Shift button and selecting individual rows.


- Go to the row you want to insert the new rows on top of.
- Go to the “Insert” option from the drop-down list in the “Home” tab and click “Insert Sheet Rows.”

This will let you add the number of rows you selected on top of your worksheet.

Another alternative method is to use Microsoft Excel’s right-click menu:
- Go to the row you want to insert rows on top of.
- Select the number of rows you want to add.
- In our example, we want to add four rows.
- Select the rows by holding and dragging the cursor on the row numbering or by holding down Shift and selecting individual rows.
- Right-click on the rows, then click “Insert.”


This achieves the same result by inserting the total number of rows you had selected on top of the rows you had selected. This method to insert multiple rows works well with any size data set.
Method 2: How To Insert Multiple Rows in Excel Using Keyboard Shortcuts
Keyboard shortcuts are convenient ways of carrying out functions. Luckily, there’s a simple Excel insert row shortcut that you can use to add new rows to your data set.
The keyboard shortcut works almost similarly to the insert option method for inserting multiple rows since you need to select how many new rows you wish to add first.
Here’s how to add multiple rows in Excel using keyboard shortcuts:
- Select the number of rows equal to the number of new rows you want to insert.
- To do this, click on the row number header on the left side of the Excel sheet.
- Drag to select the required number of entire rows.
- Press and hold the Ctrl and Shift keys on your Windows keyboard (Cmd + Shift on Mac).
- While holding the Ctrl or Cmd key, press the plus (+) key on your keyboard.
- Release the keys.

Excel will insert the same number of blank rows above the rows you had selected.
For example, if you selected two rows, pressing the Ctrl and + buttons will insert two blank rows above the rows you had selected.
This Excel shortcut is a quick and convenient way to insert multiple rows in Excel without using the right-click context menu or accessing the Excel ribbon insert options.
It’s convenient when you want to insert a small number of new rows and want to avoid using the mouse. However, if you’re looking to insert multiple rows in Excel for large data sets, you can look at the other methods.
Method 3: How To Insert Multiple Rows in Excel by Copy and Pasting
Another nifty trick you can use to have Excel insert multiple rows is copying and pasting the number of new rows you want to add. This method is a quick and easy way to insert multiple rows if you want a large number of multiple blank rows in Excel.
Here’s how to insert more than one row in Excel by copy-pasting:
- Select the number of blank rows that you wish to insert.
- To do this, click on the row number header on the left side of the Microsoft Excel sheet.
- Then, drag to select the required number of rows.


- Right-click on the rows you had selected and choose “Copy” from the context menu. Alternatively, you can press Ctrl + C on Windows (or Cmd + C) on Mac to copy the selected rows. Your selection will change to dotted lines.


- Click on the row number where you want to insert the copied rows. Ensure you have selected the row above the blank rows that you want to be inserted.
- Right-click on the multiple rows you had selected and choose the “Paste” option. For the keyboard shortcut, you can use Ctrl + V for Windows and Cmd + V for Mac.
Excel will then insert the number of rows you copied above the selected rows, pushing the existing data downward.
The copy-and-paste method allows you to insert multiple rows in Excel quickly and move existing data to create space for new entries. This method is handy when you have a specific set of new rows you wish to duplicate and insert at a different location in your worksheet.
Related: Excel vs. Google Sheets
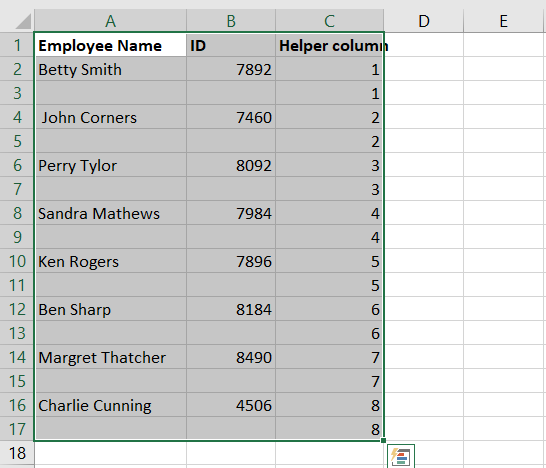
How To Add a Row in-between Rows Multiple Times in Excel
One tricky thing to do is to insert multiple rows in between rows in Excel in one go. In most cases, you would have to start inserting blank rows individually between each row. However, a clever way to get around this is using Excel’s sorting feature to insert rows. This will let you insert blank rows between the selected rows in a pattern.
Here’s how to insert several rows in Excel in between rows:
- Add a helper column with numbers or alphabets in a descending order.


- Copy the column and paste it immediately below. Depending on how many rows you want to insert, you may need to paste the column more than once. For example, if I want to insert two rows, I’ll repeat the numbers twice.


- Select the entire range of data.

- Go to “Sort & Filter” in the Excel “Home” tab.
- Choose the option to “Custom Sort.”

- In the “Sort” dialog box, go to the “Sort by” drop-down and select your helper column.


- Ensure the order is from the “Smallest to Largest,” then click “OK.”


Since the entire data set will be sorted based on the helper column, the cells with blank rows will be moved between the selected rows, giving you a single row between each row.
After you’re done inserting multiple rows, you can then delete your helper column and continue working with your data. With this method, you can insert one or two rows in between the rows in your data set easily.
Related: Group Rows and Columns in Google Sheets
Frequently Asked Questions
How do I insert 1000 rows at once in Excel?
One thing about Excel is that you can insert as many rows as you want to, up to a million.
To insert 1000 rows, go to cell A1000 and use the keyboard shortcut Ctrl (or Cmd) + Shift + Up arrow. This will select all the rows from row 1000 upwards.
You can copy the rows and go to the row you want to insert at and past the 1000 rows. This is a simple and quick way to 1000 empty rows to your data simultaneously.
How Do you Insert Rows Quickly in Excel?
The quickest way to insert multiple rows in Excel is to use the Excel insert row shortcut, Ctrl (or Cmd), Shift, and +.
First, you’ll need to select the number of rows you want to add, then use the keyboard shortcut for inserting rows.
This lets you insert multiple rows and will let you add the number of new rows that you selected, as we’ve shown you in the above example.
How Do I Insert Multiple Rows in Excel at Once?
The easiest method for inserting multiple rows at once in Excel is to select the number of new rows you want to add and use the keyboard shortcut Ctrl (or Cmd) + Shift + (+). Alternatively, you can use one of the other methods that we have shown you above.
Final Thoughts
Adding multiple rows in Excel is a simple process. There are many creative ways to insert multiple rows in Excel, depending on your needs.
In this guide, we’ve shown you each one with a simple, step-by-step guide and examples on how to insert multiple rows in Excel. We’ve also shown you how to insert multiple blank rows between existing rows. So you can get practicing and start upping your Excel game!
If you’re on the hunt for some already crafted templates, then check out our professional templates here. And don’t forget to enter the promo code SSP to save 50% off all templates!
Related: