Page breaks can be extremely helpful if you want to organize your content in Google Docs. In this article, we will guide you on how to insert page breaks in Google Docs and also explain how to view and remove them from your document.
Table of Contents
How To Add Page Breaks in Google Docs
What is a page break in Google Docs? It’s a special, non-printing character that marks the end of a page. You can add this if you want to insert a new page without completely filling up the current one.
Inserting a Google Docs page break into your documents offers several benefits. For one, it organizes your content by dividing it into multiple chunks. Furthermore, it enhances readability by providing a cleaner and more structured format.
Here’s how to insert page breaks in Google Docs:
- Go to https://docs.google.com/ and open your document.
- Navigate to the document section where you want to add the page break.
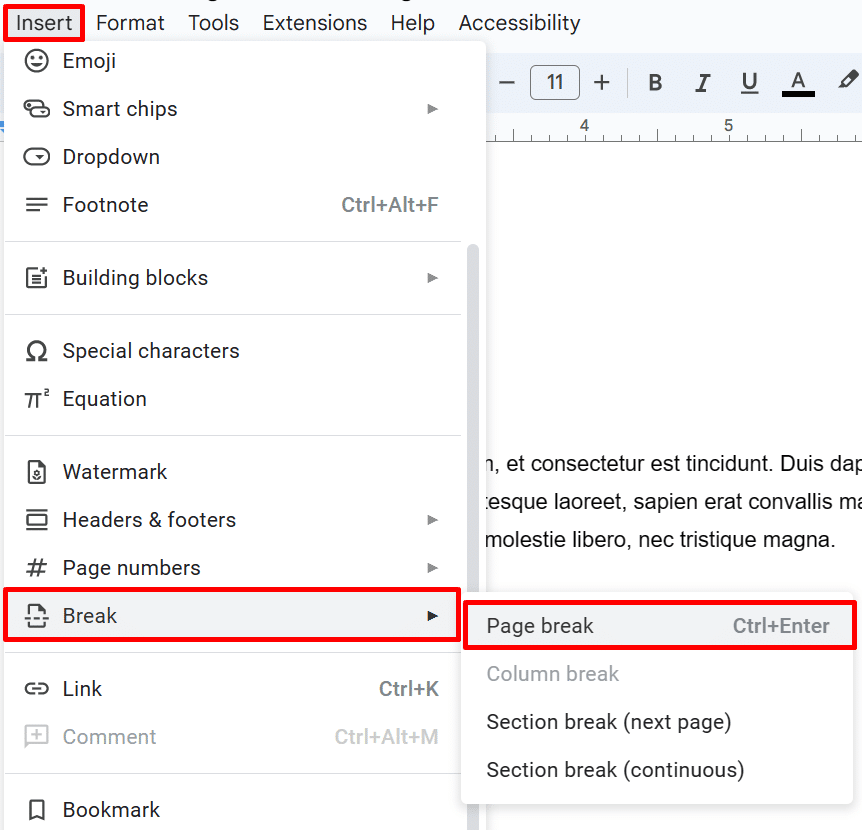
- Click on “Insert” in the menu bar, then choose “Break” followed by “Page break.”

- Alternatively, you can use the keyboard shortcut “Ctrl” + “Enter” (or “Command” + “Enter/Return” for Mac) to quickly insert a page break.
Did you know that you can also insert page breaks in Google Sheets (and assign tasks)? Check out our comprehensive guide on Google Sheets Page Breaks [How to Add, Remove & More] to learn more!
How To Insert a Section Break in Google Docs
A section break is another feature in Google Docs that functions similarly to a page break. A section break helps divide a specific page in your document into multiple “sections” or “parts.”
So, when should you use a section break? One useful application is when you need to insert multiple columns in a specific area of your document. It’s also beneficial when arranging photos and shapes within your paper. To add a section break, follow the instructions below:
- Open your document on Google Docs.
- Click on the part where you want to insert your section break.
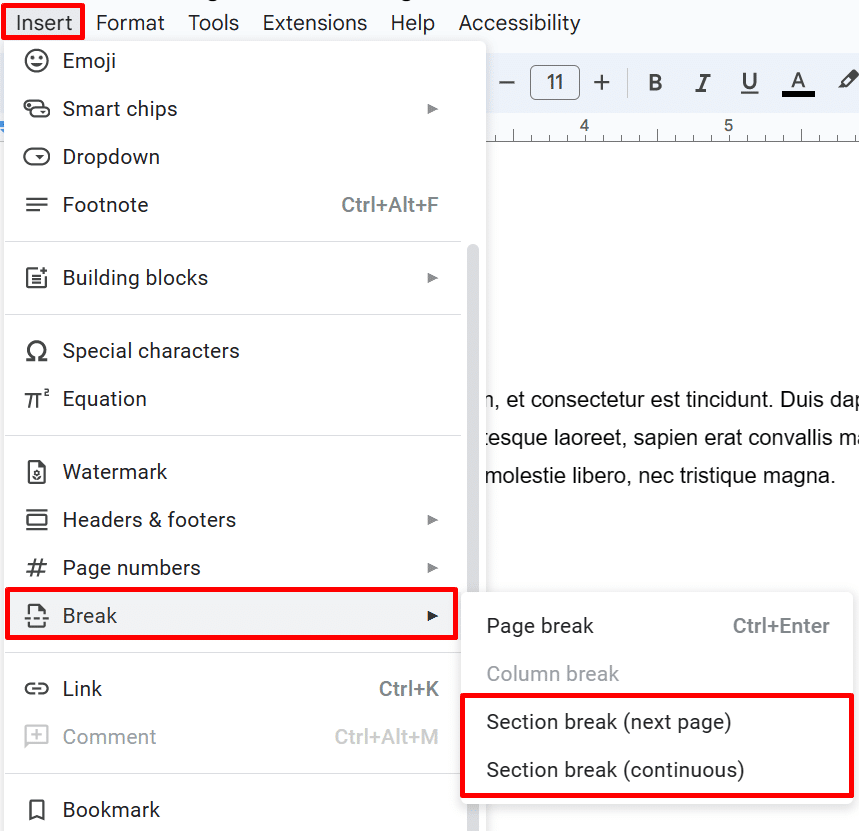
- Click on “Insert” > “Break” and choose the desired option from the menu that appears.

- If you select “Section break (next page),” the next section will start on the following page of your document.
- Alternatively, if you choose “Section break (continuous),” the section break will be inserted within the same page.”
How To Show Page Breaks in Google Docs
Normally, you wouldn’t see page breaks in Google Docs since they are considered “non-printing” characters. They do not appear when you print a physical copy of your document. But where is the page break in Google Docs that you just inserted?
Here’s how to see page breaks in Google Docs:
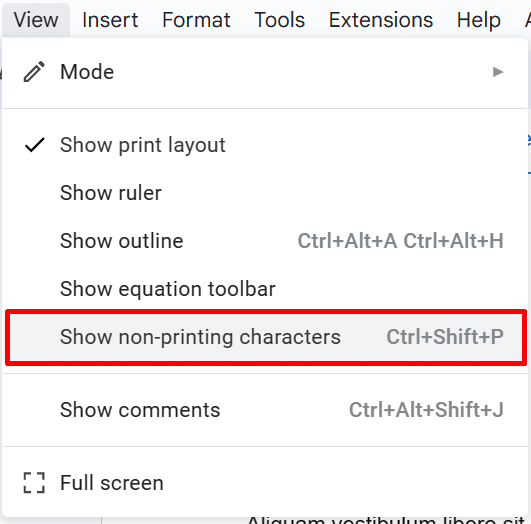
- Open your Google document, then select “View” from the menu bar.
- Click on “Show non-printing characters” from the options available.

- Alternatively, you can use the keyboard shortcut “Ctrl” + “Shift” + “P” (or “Command” + “Shift” + “P”) to display the page breaks.
How To Delete Page and Section Breaks
If you no longer need page and section breaks in your document, you can easily remove them by following these steps:
- Open your Google document and navigate to the section where you inserted a break.
- Place your cursor immediately after the page or section break.
- Press the “Backspace” key on your keyboard (or “Fn” + “Delete” for Mac) until the page break or section break is deleted.
You can treat your section and page breaks like any other character you see in your document. Therefore, you can delete them in the same way you would remove words from your work.
Frequently Asked Questions
What Is the Shortcut for Page Break in Google Docs?
For Windows users, press the keys “Ctrl” and “Enter” on your keyboard to insert a page break in Google Docs.
For Mac users, press “Command” and “Enter/Return” simultaneously instead.
What Is the Difference Between a Page Break and a Section Break in Google Docs?
If you insert a page break, you can only continue typing and adding content on the next immediate page of your document. However, adding a section break divides your content on the same page.
Final Thoughts
If you need to lay out your document properly, page breaks in Google Docs are always helpful. Just follow our guide above, and you should be able to insert them without problems.
Want a quicker way to make progress with your work? Get a headstart by checking out our premium templates today! Use the code “SSP” to purchase them at 50% off.
Related:
- How to Delete a Page in Google Docs (4 Ways)
- How to Add Page Numbers in Google Docs [Ultimate Guide]
- How to View Multiple Pages in Google Docs: [4 Easy Ways]


