To split cells in Google Sheets, highlight the cell, select the “data” menu, and click “split text to columns”. Otherwise, use the SPLIT function. I’ll demo both in my guide below.

Table of Contents
In Short: How to Split Cells in Google Sheets
Here’s how to split a cell horizontally in Google Sheets:
- Highlight the cell(s).
- Select Data > Split text to columns
Splitting Cells in Google Sheets with the SPLIT function
Google Sheets has a SPLIT function that’s great for splitting data in a cell.
Split Function Syntax
The split function is used in the Google Sheet split text to columns function by dividing texts around a specified character or string.
=SPLIT( Text, Delimiter, [split_by_each], [remove_empty_text])
- Text: The text you want to split. In this field, you’ll just select those cells you want to address.
- Delimiter: To split your text, you’ll need to identify a character (or space) you want to use to split the text.
- Split_by_each: The argument used to indicate whether the delimiter should be used as a whole word or individual characters (using TRUE or FALSE).
- Remove_empty_text: The argument used to decide whether to remove empty text messages from the split text.
Understanding Delimiters
Delimiters might sound confusing, but they’re basically just individual characters the function uses to figure out where you want to split the data. In many cases, that means you’ll use two quotation marks around a space to use a space as a delimiter (” “).

If you choose to use the Data > Split Text to Columns menu, it automatically offers a few common delimiters.

How to Use the Split Function
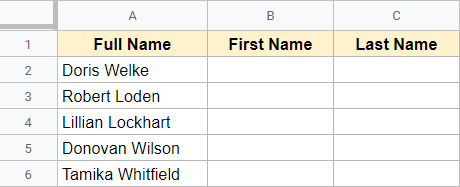
Suppose you have a dataset of names and want to split them into first and last names.
You can use the data menu to do this, or just split a cell in half in Google Sheets using the below SPLIT formula. Note that you can use the same formula for other cells in the same column as well. Here’s how the formula looks:
=SPLIT(A2," ")
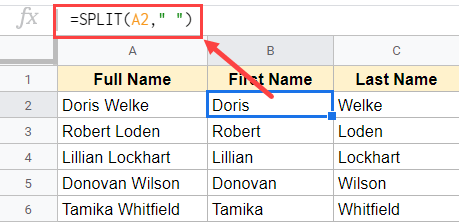
Note: This SPLIT function uses the cell reference as the first argument and the delimiter as the second argument. Since we want to split the cell content before and after the space character, I’ve specified a space character – in double quotations – as the second argument.
If you have a column where each element is separated by a comma, you can use that comma as the delimiter (which would split the cell into different columns).
Note: Because this is an array formula, you can’t remove or edit the formula result. You would first need to convert the result into a static value, then edit it.
Using SPLIT Function & ARRAYFORMULA Function
To apply SPLIT and ARRAYFORMULA to all column A cells simultaneously, replace A1:A with your actual data’s range. This will split Column A’s text wherever a comma is seen, splitting values across multiple columns (starting from B1).
Remember to adjust the delimiter within the SPLIT function to whatever character you prefer (e.g., comma).
Remember: The SPLIT Formula Is Dynamic
A major benefit of using the SPLIT formula is that the results are dynamic. This means that if I changed any of the names, the results would automatically update.
If you add more records to the split data, you can copy and extend the formula for these additional records.
Using Split Text to Columns
If you don’t want dynamic results, you can rely on another useful feature in Google Sheets: text to columns.
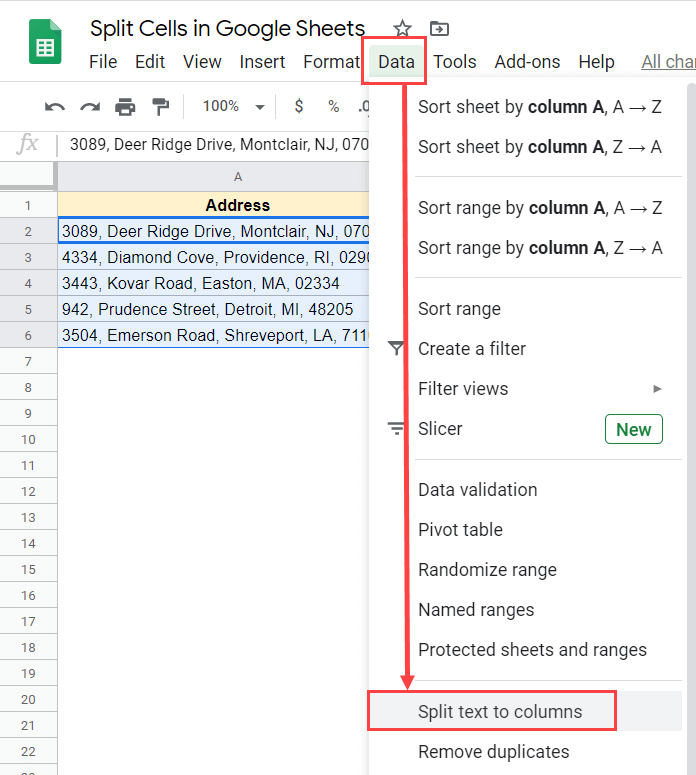
Suppose you want to split the address across separate columns:
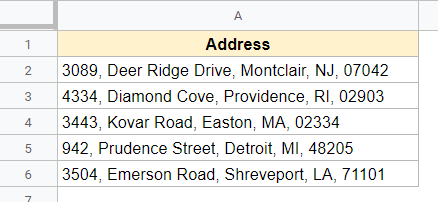
The intent here is to split the address across columns:
- House number
- Street
- City
- State
- ZIP code
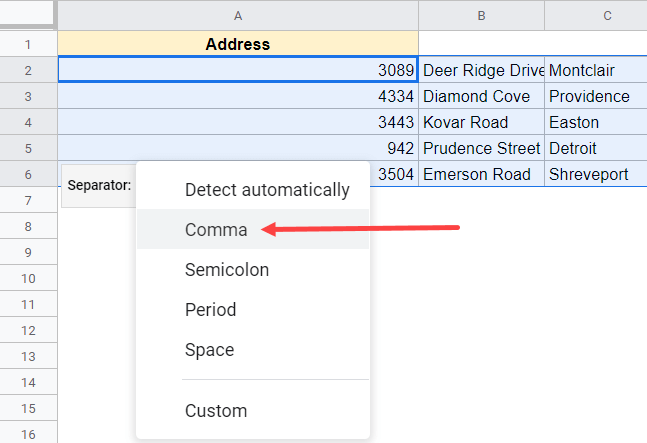
In the example above, each address element is separated by a comma.To split the cell into multiple columns:
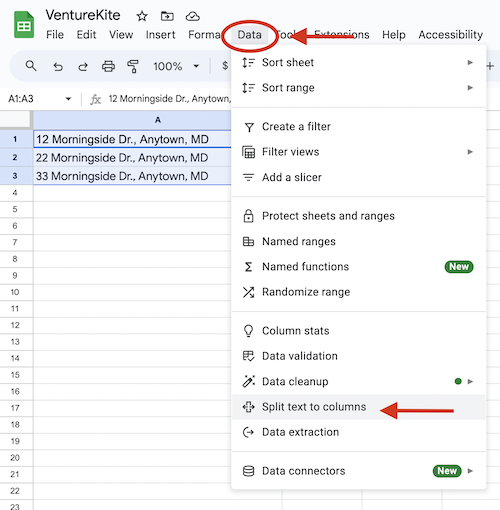
- Select the cells
- Select Data > Split text to columns.

- In the Separator dialog box, select comma as the separator
You’ll notice that the content has been split into columns, based on the delimiter:
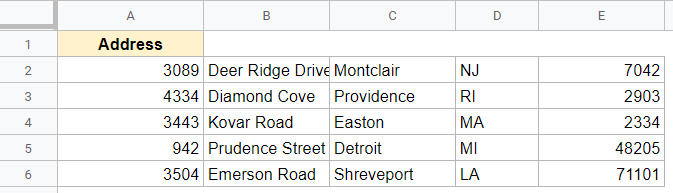
Please note that this method will replace the current text cells. To keep the original data, create a copy of the Google Sheets document somewhere else.
What Happens If I Have a Mix of Delimiters?
In some cases, the delimiter may be a mix of commas, periods, and spaces. In such cases, you might consider using “Split Text to Columns” twice: once for commas and twice for spaces.
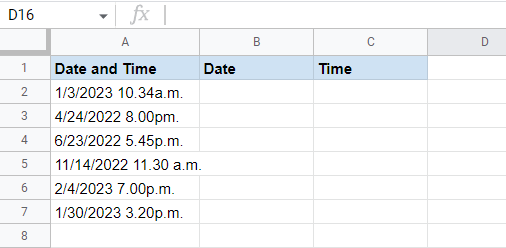
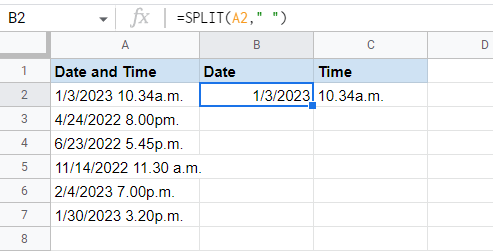
How to Split Date and Time in Google Sheets
The SPLIT method should work like the other Google spreadsheet split text to columns methods. Do you notice what’s between the date and the time in the following cells? It’s the same space we discussed earlier. That means you’ll use the ” ” delimiter to separate the cells. Here’s how it looks before any formatting:
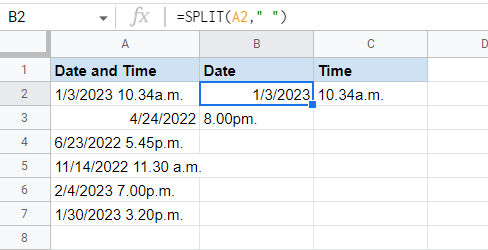
To split the date and time into separate columns, I used the formula =SPLIT(A2,” “) in the cell for the date column. This will split the date and time using the space character:
Click and drag the square (bottom-right corner of the cell) to copy the formula to the other cells.
It’s also possible use the built-in split option within the data menu. However, this method will split the names in the original column and the next column (unlike the SPLIT function).
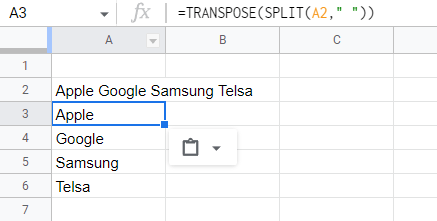
How to Split Cells in Google Sheets into Rows
To split cells into rows, combine the SPLIT function with the TRANSPOSE function.

For example, I can split the words in cell A2 into separate rows using the formula
=TRANSPOSE(SPLIT(A2," "))
Tips When Splitting Cells in Google Sheets
Here are some extra tips to separate cells in Google Sheets:
- For data to be dynamic, use the SPLIT function instead of the split menu option.
- To split the data into new columns using the split menu option, copy the column beforehand to create two new columns (and retain the original column).
- Use the keyboard shortcut CTRL+Z (Windows) or Command+Z (Mac) to combine the cells again.
- Filter your data before splitting the cells.
Frequently Asked Questions
Why Should I Learn How to Split Cells in Google Sheets?
There are plenty of reasons to separate columns in Google Sheets, but two of the most common include:
- splitting the first and last names into separate column
- separating individual parts of addresses (e.g., number, street, city, state)
- splitting dates and times
Can You Split Cells in Google Sheets?
Absolutely! You can split cells in Google Sheets using the SPLIT function or using the built-in split menu. Either method results in splitting a cell in Google Sheets horizontally, meaning you’ll end up with two columns of data.
Wrapping Up
So these are two really simple and fast ways to split cells into columns in Google Sheets.
I hope you found this tutorial useful and you now know how to split a cell in Google Sheets like a pro! If you found this article useful you might also be interested in learning how to merge and unmerge cells in Google Sheets.
If you found this guide on how to split cells in Google Sheets useful, check out awesome of our related content below.
Related:
- How to Get the Word Count in Google Sheets
- How to Change Text Case in Google Sheets (Upper, Lower, or Proper)
- How to Wrap Text in Google Sheets (with a single click)
- Remove the First Character from a String in Google Sheets
- How To Remove Duplicates In Google Sheets
- How to Sort By Multiple Columns in Google Sheets
- How to Highlight Duplicates in Google Sheets
- How to Sort by Date in Google Sheets